Pages

Sunday, December 26, 2010

Moving the Military Wife Way

I promised a post or two with my tips for how to have a successful PCS move, so here it is!

Scheduling Your Move:

The first thing to decide is what kind of move you want to do. There are 3 options:

-DITY (Do It Yourself) Move: Basically this one means you do everything yourself. Packing, hauling, unpacking, etc. is all your responsibility. The plus side is that afterwards you get reimbursed by the military for the move and you can actually end up making money in the end. We did a DITY move for our first PCS (permanent change of station) because we didn't have that much stuff accumulated yet and we were moving things from several different locations (storage room, apartment, my parent's house, etc.) It worked for us at that time but I don't think I would do it again now that we have so much more in the way of household goods.

-Government Move: The military hires a moving company to pack, move and ship everything to your new station. You do not get reimbursed for any part of it, but everything is taken care of for you. A downside is also that you are trusting someone else with all your household goods and you have to accept that fact that some things WILL get broken/lost/stolen. You can get reimbursed for those things that are broken/lost/stolen but it is a pain to file the paperwork and such.

-Partial DITY Move: This is a combination of the first two options. Basically, the military will still contract someone to move/pack/ship everything that you ask them to, but you also have the option to move some things yourself and get reimbursed for the cost to move those items. This is the option we chose this time because we have a long window in between when we checked out of our old location and when we check into our new location (about a month). Therefore, we have a lot of things that we are carrying with us to get us through the month-long homeless period (clothes, a few kitchen items, etc.) and we might as well get reimbursed for those items.

As I mentioned, we chose to do a Partial DITY so we were contacted by a moving company who was contracted by the military to set up our move.

The first thing the moving company will do is schedule you for a time to get packed and moved. You request a time period and they do their best to fit you in during that time. Our moving company had to schedule us a week sooner than we wanted, but that worked out okay in the end.

After you are scheduled, the moving company will set up a pre-move consultation, in which a representative will come to your place of residence to do a scan of your household items. The purpose of this is to answer any questions you might have and to make note of how many large items, fragile items, etc. that you are requesting them to pack and move. The representative should also tell you how to prepare for your move and what they will and will not move for you.

Prepping for the Move

Prepping for the packers and movers is probably the hardest part of doing a government or partial DITY move. Here are some important things to do before they show up on your doorstep the day of the move:

-Go through your house and get rid of everything you don't need. Moving is the perfect time for purging your clutter and unused items, and there's no need to move something that you're only going to throw away when you get to your destination. Donate it, trash it, give it to a friend, just get rid of it if you don't love it.


-Remove all items above arms reach from cabinets, shelves, closets, etc. The packers will not touch anything they can't reach so you must move everything above that down to counters or tables.


-Take everything off the walls (pictures, art, etc.) and place on the floor.


-Place all your silverware in a large ziploc or small container of some sort and ask the packers to just pack the container/bag as-is. If you don't do this, the packers will individually wrap every piece of silverware and it will take forever to unpack. You can apply this method to other small, unbreakable items too such as hairbands and clips.


- Place all your clothes into garbage bags and ask the packers to pack them as-is.

If you don't do this, the packers will touch all of your clothes (including unmentionables) and have been known to use your clothes to help wrap other household items. It's also a good idea to toss a dryer sheet into the garbage bags with your clothes to keep them smelling good (or just use the Febreze brand of garbage bags like we did).


-Move everything that you do not want them to move into a designated closet or room.


It's too much for them to try and remember not to pack certain things that you tell them to, so just make it easy by only leaving out items that you DO want them to move. We had a lot of things that we were moving ourselves, so we cleared out the entire guest room and then used that as our "off-limits to packers" room. It turned out to be really nice to have a separate room that they didn't need to go in at all because we were able to hang out in there while they were packing and not be in their way.

-Unplug any appliances and electronics that you want them to move. If you have a deep freezer, you need to unplug, empty and defrost it at least 3 days before the move.

-Drain all oil and gas out of anything that would contain it (i.e. lawnmowers).

There are some things that the moving company will say that they won't move, but I recommend just leaving those items out because sometimes they actually WILL end up packing and moving those items. Their job is to pack as quickly as possible so they just want to get it done, and often won't bother with fishing through the items that they aren't supposed to pack. Just take your chances and hope that they pack it.

Here are some things I recommend keeping with you and not letting them move:

-Cleaning supplies, vacuum, broom, mop
-Paper towels and toilet paper
-Bath towels, hand towels, washcloths
-Food for your pets (you don't want to starve your poor pets do you?)
-Shower curtain (I forgot to keep this one and I regretted it immediately...it's hard to shower without a shower curtain)
-Air mattress, bed linens, and pillows (for sleeping on after they take your bed and/or when you arrive at your new location but don't yet have your furniture yet)
-A plastic bin or two (This has a double purpose...the first is to use them to pack your items that you are taking yourself, the second is to use them as a table when all your furniture is gone.)
-Fold out chairs (so you don't have to sit on the floor)
-Firearms (In my opinion, it's just better to move these yourself. Less liability.)
-Pots, pans, baking sheet, knife, cutting board, wooden spoon, etc. (Just the bare essentials of what you will need to do basic cooking in the kitchen. You will get really tired of eating out and/or fast food so it's nice to have the option to cook something yourself.)

Okay well that's all I have time for right now. I'll try to do another post in the next week or two with the rest of my abundant knowledge on moving. ;-)

I have to give credit to my friend Angie for a lot of these tips. She is an expert Army wife and several of these tips came from a blog post she made about moving.

Thursday, December 9, 2010

Turning my Frown Upside Down

Moving can be kind of a downer, especially if you're moving far away from all that you know. But there are some things that are helping to turn my frown upside down...

1. An excuse to drink Starbucks every morning, because the coffee maker is en route to Arizona.
Tall coffee with a pump of Cinnamon Dolce syrup, leave room for cream please! I'm becoming a Starbucks ordering pro!

2. The fact that I can still spend 30 minutes a day with my beloved Jillian DVD, even in a furniture-less house.
I purposely kept my 30 Day Shred DVD, hand weights, DVD player and yoga mat back from the movers for this very purpose. :)

3. My current nail color
Russian Navy by OPI...it makes me happy everytime I see my nails!

4. The fact that we can still have delicious home cooked dinners, even with the bare minimum of kitchen tools and food.
Last night's Beef & Veggie Spaghetti. It may not look pretty, but it was so satisfying.

5. The fact that our air mattress is SO MUCH more comfortable than I ever anticipated. I was DREADING the nights of sleeping on an air mattress, but it turns out it's not nearly as bad as I thought.
I highly recommend this brand of air mattress. It really is EXTRAORDINAIRE! :)

Wednesday, December 8, 2010

What do I do with Wheat Bran?

Remember how I talked about cleaning out my pantry a few weeks ago? Well, as I was taking inventory of all my pantry items, I found an almost-full bag of wheat bran and had no idea why I even had it in the first place.
What the heck do I do with wheat bran?!

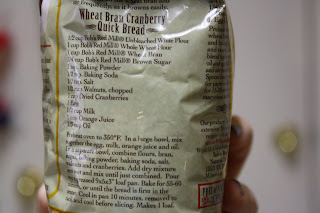
Then I turned the package around and noticed a yummy sounding recipe for Cranberry Quick Bread.
And I just happened to have all the ingredients on hand. I also needed a breakfasty (it's a word) item to send with Alex to work the next day for his "Birthday Breakfast" with his squadron. I love when things like that happen! It's just meant to be. :)

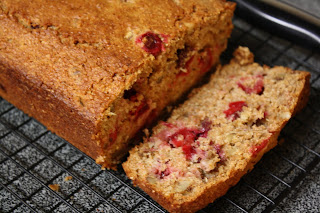
So I got to cookin' and this recipe came together in NO time! The hardest part was waiting the hour that it takes to bake. But when it's done, you get rewarded with this beauty:
YUM! Golden brown perfection!
And the taste is really great too. It's not too sweet with the lovely contrast of tart cranberries and the bran and walnuts add a nice texture to it.
This recipe is one that I would make again and again. In fact, I would probably go make it right now, if it weren't for the fact that I'm sitting in an empty house without any of my kitchen tools. Turns out, a random package of wheat bran isn't such a bad thing to have around after all!

Disclaimer: Although this recipe may seem healthy, since it includes things like whole wheat flour and wheat bran, it really isn't (see nutritional info at the bottom of the recipe). I'm sure there are a lot of healthy substitutions that could be made for the oil, egg, orange juice, etc. but I haven't experimented with that yet. Maybe I will sometime soon though.

Wheat Bran Cranberry Quick Bread

1/2 cup White Flour, Unbleached
1 cup Whole Wheat Flour
1 cup Wheat Bran
3/4 cup Brown Sugar
1 tsp. Baking Powder
1/2 tsp. Baking Soda
1/2 tsp. Kosher Salt
1/2 cup Walnut Pieces
1 cup Cranberries (I used half dried and half frozen)
1 Egg
1/2 cup Milk
1 cup Orange Juice
1/3 cup Oil

Directions:
Preheat oven to 350°F. In a large bowl, mix together the egg, milk, orange juice and oil. In a separate bowl, combine flours, bran, sugar, baking powder, baking soda, salt, walnuts and cranberries. Add dry mixture into wet and mix until just combined. Pour into a greased 9x5x3” loaf pan. Bake for 55-60 minutes, or until the bread is firm in the center. Cool in pan 10 minutes, remove to rack and cool before slicing. Makes 1 loaf, yielding 12 slices.

NUTRITIONAL INFORMATION

Serving Size: 1 Slice (87g) - Calories 220, Calories from Fat 70, Total Fat 7g, Cholesterol 20mg, Sodium 200mg, Total Carbohydrate 39g, Dietary Fiber 4g, Sugars 22g and Protein 4g.

Ashley's Notes: These could also easily be transformed into muffins, by placing the batter in muffin tins and decreasing the cooking time by about half (just a guess).

Monday, December 6, 2010

Moving Madness

I disappeared from blog world. Forgive me? Please? I have good reasons.

The past couple of weeks have been a mish-mash of traveling (Thanksgiving), finishing up at my job (last day was this past Friday), and prepping for the impending move.

Today was the day the packers came and packed our life into box after box after box.

116 boxes, to be exact. (According to the packers, this isn't that much, but I beg to differ!)

There are piles everywhere I look. Piles of boxes, piles of things to be donated to Goodwill, piles of things we are moving ourselves, piles of dog hair on the floor since I decided there was no time and/or reason to clean (and now that I see the state of my house after the packers came, I think I made the right decision).


At least one person in the house likes all the piles...

More things to nest on makes for a happy dog.

But there's also a lot of emptiness in the house (and it's only going to get worse when the movers come to pick up all the boxes tomorrow).
Empty shelves.

Empty closets.

Empty pantries. Empty cabinets. Empty stomachs (okay, not really...we've been surviving on a Pizza Diet...the diet of champions).

Now that most of the hard work is over, I should have plenty of time to catch up on backordered blog posts over the next week and a half.

I'll need something to keep me entertained, since I'm now "gainfully" unemployed and living in an empty house for the next week and a half before we leave for good. (You should see the amount of stuff I posted on the Book of Faces (facebook) today...it was borderline ridiculous, but I was bored!!)

I also plan on writing a couple of blog posts about doing a military move, since there is so much that goes into it.

So get ready for some fun. :)

Friday, November 12, 2010

25 Books in 2010: Book 11

I'm never going to make it to 25 books in 2010! But that's okay because I do realize that I've had a LOT going on in my life this year. Also, I've been kind of unlucky with my choice of books this year....nothing has really been a page turner for me, until now....


1. The Gastronomy of Marriage by Michelle Maisto {click here for my review - 5 stars}

2. Shelter Me by Juliette Fay {click here for my review - 3.5 stars}

3. Dear John by Nicholas Sparks {click here for my review - 2 stars}

4. Dead as a Doornail {Sookie Stackhouse/True Blood, Book 5} by Charlaine Harris {click here for my review - 4 stars}

5. The Mercy of Thin Air by Romlyn Domingue {click here for my review - 1 star}

6. The Year of Fog by Michelle Richmond {click here for my review - 2 stars}

7. Definitely Dead {Sookie Stackhouse/True Blood Series, Book 6} by Charlaine Harris - 4 stars

8. All Together Dead {Sookie Stackhouse/True Blood Series, Book 7} by Charliane Harris - 3.5 stars

9. The Girl with the Dragon Tattoo by Stieg Larsson - 2.5 stars

10. The Story of Edgar Sawtelle by David Wroblewski - 2 stars


11. Sarah's Key by Tatiana deRosnay - 4.5 stars
I really enjoyed this book....FINALLY a book that I can rave about!
It's the story of a young Jewish girl in France, in the midst of Nazi roundups during World War II, and also the story of a modern day American journalist who is investigating the events surrounding the French roundup.
I loved the combination of historical fiction and a modern day (fictional) story. I can't always get into historical fiction, but this one kept me hooked because there were two storylines, both equally enthralling.
Highly recommend Sarah's Key!
I wish I could add a 12th book to this list but I gave up halfway through on my 12th book: Suite Francaise. I'm sure it's a great book but I just couldn't get into it at this time. It was boring me to tears so I gave up on it and moved on to the next Sookie Stackhouse book in the series because I know those books are always light, easy reads for me. C'est la vie!

Operation: Pantry & Freezer Clean Out

Earlier this week we had our pre-moving consultation, where a representative from the packing/moving company came to our house to make note of our items that will be moved.


During this consultation, the woman mentioned that the moving company "will not pack or move any opened food items, any liquids of any kind, flour, sugar, rice, etc."


Crap. Crappity crap crap.


Our pantry currently looks like this:
You better believe the shelves behind the swivel shelves are all full too...yes I have a problem.

And our deep freezer currently looks like this:
Lots 'o Food piled in there.

This doesn't even take into consideration the full fridge and regular freezer! Apparently, I have a serious problem with overbuying food, and yet, somehow, I still always feel like "there's no food in the house" unless I've gone to the grocery store that week. Maybe my problem is that I buy useless food.


Either way, it's officially time for Operation: Pantry & Freezer Clean Out. The packers come on December 6th, which means I have less than a month to use up stuff.


I'm morally opposed to throwing out perfectly good food so I'm using up as much as I can and then either donating it to a food pantry or taking it with us and using up valuable space in our cars. More likely the latter, since I'm cheap and I hate the idea of not using food that I paid good money for!


I'm probably still going to go the grocery store once a week, but I'm going to try reeeeeeally hard to limit my purchases to things like milk, eggs, bread and fresh fruit & veggies to supplement our pantry meals.


I'm also planning on baking up a storm to use up all the baking supplies I have. (Remind me again why I JUST replenished my huge-ass flour container? Sometimes I'm really smart.)


So if you're my friend and/or coworker, be prepared for me to probably pawn off huge amounts of baked goods on you.


Or maybe I'll just take care of them myself. It is practically the holiday season, right?!? Gaining weight is a natural part of the season! ;-)

If I was a good blogger I would have already made several example freezer/pantry clean-out meals and have pictures and recipes to share with you, instead of just rambling on about what I'm planning on making.

But I'm not a good blogger. So you'll have to wait and see what creations I come up with. :)

Wednesday, November 10, 2010

Blogging in the Dark

I really hate that it gets dark so soon now.

When I left work tonight at 6:15, it was PITCH BLACK outside. That pretty much made working late suck 10 times more because it FELT like working til 9pm.

Then I come home and cook a delicious Mexican casserole, plate it up, and take some very mediocre photos of it due to the little issue of not having any natural light. Fudge.


Luckily, with the magic of Picasa, I was able to infuse a little bit more life into the photos, but they're still not great.

Stupid daylight saving time.

Anywho, this casserole was delish and definitely is not done justice by the photos. It also makes a great freezer meal. In fact, I divided mine up into two square pans (instead of one rectangular) and froze one for later.

Mexican Casserole
Source: Seen on Meals & Moves

Ingredients:

1 lb ground turkey, chicken or beef
1 green bell pepper, diced
1/2 red onion, diced
1 packet low sodium taco seasoning
2 cups cooked brown rice
1 (15 oz) can black beans, drained
2-3 tomatoes, diced (I used a couple of canned tomatoes)
1 (11 oz) can green enchilada sauce (I used red enchilada sauce)
1 (4.5 oz) can diced green chiles
1 cup 0% plain greek yogurt (can sub sour cream)
1 cup shredded cheddar cheese
avocado or guacamole for garnish
serve with whole wheat tortillas (We served with steamed broccoli, since the rice was enough carby goodness for us)

Directions:

Preheat oven to 350 degrees.

In a large, deep skillet, sauté your onion and bell pepper over medium-high heat. When the vegetables are tender, add the ground meat (turkey in our case) and cook until it's cooked through. Add taco seasoning, rice, black beans, tomatoes, enchilada sauce & green chiles and combine well. When the mixture is heated through, turn off the heat and stir in greek yogurt.

Transfer the mixture into a greased baking pan (either one 9x13 or two square pans). Top with cheese, cover with foil, and bake for 20 minutes at 350 degrees. Remove foil and bake for another 10 minutes. Remove, let cool for a few minutes, and serve with avocado or guac.


Monday, November 8, 2010

I love my...

...new cognac boots!


I've been searching for the perfect pair of cognac boots for a while now. My requirements were this:
1) Must be flat...I hate wearing boots with heels.
2) Must be big enough around the calf for my giant calves....seriously they are huge and I hate that it's so hard to find boots that allow wiggle room in the calf.

I stumbled upon these boots at Kohl's this past weekend and almost squealed with joy when I tried them on and realized there was plenty of room in the calf. SUCCESS!!!

I got them on sale for $45 plus an additional 15% coupon. Heck yeah!

Here's a link to their online listing, if you're interested.


Paired with a charcoal sweater dress and grey tights, I felt like quite the fashionista today!

(Please excuse the randomly placed computer chair in the background....we were doing some organizing in the study and needed to move it out for extra moving room.)

Sunday, November 7, 2010

Homemade Almond Buttah

I've always wanted to try making my own nut butter, and today I did!


I must say, it was wildly successful!

I chose this recipe for Pumpkin Spiced Almond Butter from a blog called Edible Perspective. The flavors all sound delicious so I was sure this would be a winner...and I was right!

This recipe was a little more labor intensive than just tossing some roasted nuts and oil in a food processor, since you actually roast the nuts yourself, but it's still pretty easy. Timewise it takes about 45 minutes to an hour but most of that time you can just walk away and let it do its thing.

Pumpkin Spiced Almond Butter

2 cups raw almonds
2 Tbsp maple syrup
1 Tbsp maple syrup
1.5 Tbsp molasses
2 tsp cinnamon
1/4 tsp ginger
1/8 tsp nutmeg
1/2 tsp salt
1 1/2 Tbsp canola oil

Disclaimer: I edited some of the instructions to read the way I made this. If you want the author's original instructions go to the link.

Preheat your oven to 300 degrees
Combine 2T maple syrup, 1T molasses and almonds in a bowl. Stir well to coat.
Spread the almonds on parchment paper, on a baking sheet.
Roast for 30 min, stirring once every 10 min. The nuts will get stickier the longer they cook.
Take out of the oven and let cool for about 30 min. At this point the nuts will have a brittle molasses/syrup coating around them.
Dump into your food processor and turn on.
Keep processing and scrape down the bowl as needed, until it butterizes and becomes smooth and liquidy....about 10-15min. [Past the stage where it has formed a large ball of dough]
Add in 1/2 T molasses, 1 T maple syrup, 1 1/2T oil, all spices and salt.
Process again until smooth consistency is met about 5 min. [If you want it even smoother, add another 1/2-1T oil]

This is what mine looked like when I was finished:


Then I just dumped all the nut butter into an almost-empty almond butter jar that I had and stuck it in the fridge for future snacking. :)


Definitely worth trying this recipe! The best part is that you know exactly what all the ingredients in it are...no guessing about weird processing ingredients!

Saturday, November 6, 2010

Victory Soup

I foresee myself being forced to make this soup again 3 more times in the next 3 weeks.

Reason being, my husband is extremely superstitious about Aggie football.

For example, as we were watching the A&M vs. OU game tonight, he refused to take off his shoes and socks until the end of the game because he was afraid it would change the tide of the game. Um, what?

Another example, he was drinking Shiner Bock beer during the first half when we were winning, then during the 3rd quarter he switched to St. Arnold and we started sucking, so he switched back to Shiner. Interesting coincidence? Nope, not to my husband.

And since we did end up winning against #8 OU tonight (WHOOP!), I foresee him demanding I make this same Chicken Taco Soup for the final 3 games of the season, in order to avoid "jinxing" our beloved Aggies.


Luckily, I will have no objections to this request, since this soup was delicious AND easy. That's a winning combo in my book!

This recipe was given to me by a coworker, which I tweaked to better suit our needs a bit. Trust me when I say, it is SO good! My favorite part is the extra flavor that the ranch & taco seasoning packets add to it.


Chicken Taco Soup
Source: no idea who the original recipe comes from, but I got it from a coworker

-1 tsp Olive Oil
-1 Onion, chopped
-2 Bell Peppers, chopped
-1 can Ranch-style Beans
-1 14.5 oz can Stewed Tomatoes
-1 can Rotel with Green Chiles
-3-4 cups of cooked, shredded Chicken (you could use any leftover chicken for this but we roasted 3 whole, bone-in chicken breasts at 425 degrees for about 45 minutes)
-1 packet reduced-sodium Taco Seasoning
-1 packet Ranch Dressing mix
-4 cups reduced-sodium Chicken Broth
-1/2 cup Frozen Corn

Toppings: plain greek yogurt (or sour cream), sharp cheddar cheese, chopped avocado, Fritos corn chips (or tortilla chips)

Heat oil over medium-high heat in a soup pot. Add bell pepper and onion and saute until tender.

Add all the rest of the ingredients and stir well to combine. Reduce heat to medium-low and simmer for 30-45 minutes. (Side note: You could also easily adapt this for a slow cooker....just toss all ingredients in and cook on low for 6-8 hours)

Serve soup with toppings as you please. Enjoy!

Recipe makes enough for 6-8 servings, at least. We have tons of leftovers!

Oh and before I go, I just have to share this pic of my pup.


Lately, with the sun going down so early, I've resorted to taking food photos in our mud room, since we get the best bright light in there. In that room we have a little doggie door and my pup likes to stick her head through and check on what I'm doing when I'm in there.

You know, cuz she's too lazy to come all the way through the door.

And one more thing, these:
Are amazing. They're from Target, if you're wondering.

That is all.

Monday, November 1, 2010

Vote for Soup

Other soups want you to believe that they are the best choice for your Fall comfort meal, but they are liars.

Other soups say that they are quick and easy, but the facts are that they are not.

This soup may seem simple and plain, but it is actually very flavorful and delicious.

But most importantly, this soup is emphatically endorsed by The Hubster.

So please, vote for White Bean Soup with Kale & Sausage tomorrow. You won't regret it!

This message brought to you by Cupcakes & Combat Boots.

:)

Anyone else sooooooooooo tired of all the election commercials?? Geez...I'm glad tomorrow is election day because I've had ENOUGH of them.

This recipe was adapted from one for White Bean Soup with Kale & Chorizo in the latest edition of Cooking Light. The major change that I made was subbing in smoked Italian hot sausage for Spanish chorizo, since my grocery store doesn't carry Spanish chorizo.


I honestly couldn't believe how much the Hubs loved this....he kept complimenting it over and over. I thought it would be a little too "light" and "kaley" for him, but I was clearly wrong!

And the very best part of this recipe, it came together in less than 30 minutes! Score!

Seriously, make this soup. It's really surprisingly awesome!


White Bean Soup with Kale and Sausage
Adapted from Cooking Light

Ingredients

-4 ounces any smoked sausage (we used hot Italian), finely chopped
-1 cup onion, chopped
-4 garlic cloves, minced
-5 cups lower-sodium chicken broth
-2 (15-ounce) cans organic cannellini beans, rinsed and drained
-5 cups kale, stripped from stems, rinsed and torn into pieces
-1/2 teaspoon freshly ground black pepper
-1 teaspoon red pepper flakes
-1 teaspoon smoked paprika

Preparation

1. Heat a soup pot over medium-high heat. Add sausage to pot; sauté 1 minute. Add onion and garlic to pan; sauté 5 minutes or until tender.

2. Add broth and beans to pot; partially mash beans with potato masher. Bring to a boil. Stir in kale and spices; cook over medium heat 10 minutes.

Saturday, October 30, 2010

A Hangover and Enchiladas

Today I did basically nothing all day because I was "sick".....and by "sick" I mean hungover. I think I'm officially too old to drink copious amounts of alcohol. It was rough!

The culprit for the hangover was a very fun Halloween party that we went to last night. Hubs and I dressed up as the Blues Brothers, I drank margaritas and played MANY games of cornhole and beer pong. Too many, in fact, but I was winning so I kept going to prove it wasn't a fluke!

If only having so much fun didn't result in a terrible all-day long hangover and one stint with my head over the toilet at 9 am. Yuck!

When I finally started to feel human again around 6 pm tonight and the thought of food hitting my mouth didn't make me gag, I decided to cook.
Veggie Enchiladas....aka hangover cure

And I'm so glad I did, because this is probably one of my new favorite dishes.

I spotted the recipe over on How Sweet It Is a while back and had it bookmarked since. I'm so glad she shared this because it is a great way to incorporate lots and lots of veggies in a more palatable way for those who aren't huge veggie fans (ahem husband).

Plus, it's warm and gooey and cheesy! Who doesn't love those things?!


I modified the recipe slightly so my way is listed below. My mix of veggies was pretty random, but that's the great thing about this recipe: you can modify it to include whatever veggies you have on hand!

Loaded Veggie Enchiladas
Source: Modified from How Sweet It Is

8-10 whole wheat tortillas
1 tablespoon olive oil
1 green pepper, chopped
1/2 red onion, chopped
2 medium white or red potatoes, chopped
1/2 cup butternut squash, chopped
1/2 cup broccoli florets, chopped
1 summer squash, chopped
1 cup refried black beans (half a can)
1 can red enchilada sauce
1 1/2 cups shredded Mexican blend cheese

Preheat oven to 350.

Heat a skillet on medium heat and add olive oil. Add peppers, onions, potatoes and butternut squash, sprinkle with salt and saute until soft, about 8 minutes. Add in summer squash and broccoli, sauteing for another 5 minutes. Add refried beans and half the can of enchilada sauce, mixing until combined and heating through.

To assemble enchiladas, add about 1/2 cup mix into the center of a tortilla and roll tightly. Add to baking dish and repeat with tortillas and mix. Top with remaining enchilada sauce and cheese.

Bake at 350 for 15-20 minutes.


Hangover officially cured.

But I'm still never drinking alcohol again. (yeah right)

Sunday, October 17, 2010

Yes, I Still Shave My Pits

I made my own granola today.

But yes, I still shave my pits. I'm not that granola. :)


(Thanks to my husband for that brilliant idea of a post title. He makes me laugh.)

When I was visiting Seattle my friend Megan fed us some of her homemade granola and was talking up the ease and cost effectiveness of doing it yourself. I can honestly say that I never even really thought about making my own granola, which is weird for me since I'm always looking for new things to cook/bake.

Anyway, after eating Megan's delicious homemade granola I knew I needed to try making some of my own soon. Then I saw Heather Eats Almond Butter post about how she made her own granola using this recipe from Healthy Coconut.

Double Coconut Nut Granola? Um...yes please!


And let me tell you, this stuff is like CRACK! My hand kept finding its way in the bowl after it was done cooking!
See?

I can't wait to add this to yogurt, oatmeal, ice cream....so many possibilities!

Double Coconut Nuts Granola

Source: Healthy Coconut

  • 1 & 3/4 cups rolled oats
  • 1/2 cup slice almonds
  • 1/4 cup chopped walnuts
  • 1/2 cup unsweetened coconut (I used coconut "chips" instead of flakes...they were a bit more substantial, which I like)
  • 2 tbsp agave (You could sub in honey if you don't have it)
  • 2 tbsp coconut oil (If you don't have it, any oil would probably work here...although then it would only be Single Coconut Granola)
  • 1 tbsp vanilla

Preheat oven to 300 degrees. Put agave and coconut oil on very low heat until thin. Stir in almonds, walnuts, coconut and vanilla. Mix until they are coated well. Add oats to the mixture and mix well.

Transfer the mixture on a greased non-stick cookie sheet. Spread them evenly. Bake for 10 minutes and then stir mixture. Bake for another 10 minutes or so. Watch it carefully. The mixture will turn brown quickly.