Pages

Monday, January 17, 2011

My New Favorite Dessert Recipe: Cranberry & Apple Cake

This recipe is one that I actually made back in December, but I am finally getting around to posting it. Trust me though, the time it took me to post it has NOTHING to do with the quality of the recipe.

Ina Garten's Easy Cranberry & Apple Cake is actually probably one of my favorite things I made in all of 2010! That's high praise, coming from me!

I found the recipe while browsing through a cookbook that my mom received as a gift for Christmas. I wasn't super impressed with the majority of the cookbook but this particular recipe definitely caught my eye. I'm so glad I made it, because it's amazing and SO easy! Essentially it's just pouring a batter on top of some lightly sweetened fruit....Ina is right: "How easy is that?!" :)


It's actually more like a cross between a cobbler and a pie than it is a cake, but regardless it's awesome. You can't go wrong with the delicious combo of tart cranberries, apple and sweet "cake".


I served the cake to a whole bunch of my family over the holidays and therefore didn't remember to get a photo of a slice, so this photo from the cookbook will have to do...

easy cranberry & apple cake
 

Source: How Easy is That by Ina Garten

Serves 6 to 8


12 ounces fresh cranberries, rinsed and picked over for stems

1 Granny Smith apple, peeled, cored, and diced

½ cup light brown sugar, lightly packed

1 tablespoon grated orange zest (2 oranges)

¼ cup freshly squeezed orange juice

1 & 1⁄8 teaspoons ground cinnamon, divided

2 extra-large eggs, at room temperature

1 cup plus 1 tablespoon granulated sugar

¼ pound (1 stick) unsalted butter, melted and slightly cooled

1 teaspoon pure vanilla extract

¼ cup sour cream

1 cup all-purpose flour

¼ teaspoon kosher salt


Preheat the oven to 325 degrees.


Combine the cranberries, apple, brown sugar, orange zest, orange juice, and 1 teaspoon of the cinnamon in a medium bowl. Set aside.


In the bowl of an electric mixer fitted with the paddle attachment, beat the eggs on medium-high speed for 2 minutes. With the mixer on medium, add 1 cup of the granulated sugar, the butter, vanilla, and sour cream and beat just until combined. On low speed, slowly add the flour and salt.


Pour the fruit mixture evenly into a 10-inch glass pie plate. Pour the batter over the fruit, covering it completely. Combine the remaining 1 tablespoon of granulated sugar and 1⁄8 teaspoon of cinnamon and sprinkle it over the batter.

Bake for 55 to 60 minutes, until a toothpick inserted in the middle of the cake comes out clean and the fruit is bubbling around the edges. Serve warm or at room temperature.

Back in Action!


Good news! The first thing I unpacked was all our kitchen supplies so I could get back into the cooking/baking mode. Screw setting up the bed or worrying about unpacking silly things like clothing. I have my priorities, people! :)

So the first thing I baked was a recipe that I actually attempted before the move and failed miserably. The recipe is the extremely popular (in the blog world at least) MamaPea's Chocolate Chip Cookie Dough Balls. They're supposed to be like a chocolate chip cookie on the outside, but doughy and gooey on the inside.

Side Note: If you haven't already, please check out MamaPea's blog! She is a hilarious mom of 2 little girls who also happens to be a vegan. I'm not much for vegan cooking, but I totally love her blog and she even makes me want to be a vegan for a split second. But then I get a craving for a big juicy cheeseburger and that thought fades away pretty quickly.

The first time I made them they turned out wayyyyyyyyy too dry and crumbly...not "doughy" at all. This time I added some extra liquid to make them less dry and they turned out much better....however I still wish they were a tad bit more "dough-like" on the inside. There's always room for improvement!


Also, you're supposed to chill the dough before baking for 30 minutes in order to keep the dough balls from flattening while baking....however I am an impatient person so I decided to skip this step. To compensate for the lack of chilling, I baked them in a mini muffin tin to help them keep their shape. It actually worked pretty well and they look like cute little mini muffin cookies. :)


Peanut Butter Cookie Dough Balls
adapted from Peas and Thank You

1/2 cup softened butter or margarine
3/4 cup creamy peanut butter
1/2 cup brown sugar
3/4 cup powdered sugar
1/2 tsp. vanilla extract
1 tsp. baking powder
1/2 tsp. baking soda
3/4 tsp. salt
1 cup whole wheat pastry flour (or you can use cake flour)
1/2 cup all-purpose flour
1-2 Tbsp of milk (if needed to reduce dryness)
1 cup chocolate chips

Beat butter, peanut butter, sugars and vanilla in the bowl of a stand mixer until fully incorporated. In a separate bowl, combine baking powder, baking soda, salt and flours. Slowly add the flour mixture to the mixer bowl and mix until a dough forms. The dough should be slightly crumbly but not dry....if it's dry at this point, add the milk. You should be able to form them into balls without them falling apart on you. Stir in the chocolate chips. Chill for 30 minutes.

Preheat your oven to 350 degrees. Scoop dough with a mini ice cream scoop, roll into a ball and place on a cookie sheet. Bake for 10-12 minutes. They’ll still be soft and look much like they did going in, but don’t overbake. The bottoms will be very lightly browned. Let the dough balls rest on the pan for a minute before transferring to a cooling rack to cool completely.

Tuesday, January 11, 2011

2011 Resolutions

Hi friends!

Sorry for the blogging hiatus. We were busy spending the holidays with family and then working on getting settled in our new home in Arizona. (More on that later.)

How about some resolutions?! It is the new year after all! And hopefully this will help to keep me on track and accountable.

1. Organize and De-Clutter my Life.

While we're living here in Arizona I am not planning on searching for a new job, since we'll only be here for 6 months. That means I should have PLENTY of time to get my life de-cluttered and simplified. This means getting rid of anything that isn't important to me and making everything else easily accessible and orderly. Maybe I should invest in a label maker?!

2. Shop Smarter (at the grocery store).

I'm going to try a LOT harder this year to use up food that we already have BEFORE buying new food. I may also try couponing, now that we're a one-income family and I have more time on my hands.

3. Live in the Moment, Stay Positive and Be Thankful

I need to take more time to enjoy the things around me and stop fretting about things I can't control. Although 2010 was a really hard year for me (for various reasons), I still have a lot to be thankful for. I vow to stop letting those "bad" things overshadow the good.

4. Moisturize!!

This may seem like a frivolous one, but Arizona is really dry. REALLY dry. I've never been much of a moisturizer (perhaps because I grew up in the humidity capital of Texas?) but my skin is seriously suffering since moving here.

5. Be Active.

Do something active at least 6 days a week. That doesn't necessarily mean working out, but maybe taking the dog for a long walk, going fishing with the Hubs, shooting some hoops, hiking in the beautiful Arizona foothills and so on. This will also help me to not become a Stay-At-Home-Wife-Hermit and get out of the dang house! :)

6. Be a Better Friend.

I'm a notoriously bad long-distance friend, but it's time to change that. I need to take more time to catch up with my friends and make them feel like they are still special to me. Whether that means talking on the phone (which I hate), chatting on Gchat, sending an email or a cardor whatever, I need to do it.

7. Make it Myself....Whenever Possible.

Make it instead of buy it. Bake my own bread, craft my own greeting cards, refurbish furniture instead of buying new....you get the picture.

I think that's it! Thanks for letting me share my resolutions with you and I hope you'll help to keep me accountable. Feel free to share some of your resolutions in the comments!

Happy New Year and here's to an amazing 2011!

Sunday, December 26, 2010

Moving the Military Wife Way

I promised a post or two with my tips for how to have a successful PCS move, so here it is!

Scheduling Your Move:

The first thing to decide is what kind of move you want to do. There are 3 options:

-DITY (Do It Yourself) Move: Basically this one means you do everything yourself. Packing, hauling, unpacking, etc. is all your responsibility. The plus side is that afterwards you get reimbursed by the military for the move and you can actually end up making money in the end. We did a DITY move for our first PCS (permanent change of station) because we didn't have that much stuff accumulated yet and we were moving things from several different locations (storage room, apartment, my parent's house, etc.) It worked for us at that time but I don't think I would do it again now that we have so much more in the way of household goods.

-Government Move: The military hires a moving company to pack, move and ship everything to your new station. You do not get reimbursed for any part of it, but everything is taken care of for you. A downside is also that you are trusting someone else with all your household goods and you have to accept that fact that some things WILL get broken/lost/stolen. You can get reimbursed for those things that are broken/lost/stolen but it is a pain to file the paperwork and such.

-Partial DITY Move: This is a combination of the first two options. Basically, the military will still contract someone to move/pack/ship everything that you ask them to, but you also have the option to move some things yourself and get reimbursed for the cost to move those items. This is the option we chose this time because we have a long window in between when we checked out of our old location and when we check into our new location (about a month). Therefore, we have a lot of things that we are carrying with us to get us through the month-long homeless period (clothes, a few kitchen items, etc.) and we might as well get reimbursed for those items.

As I mentioned, we chose to do a Partial DITY so we were contacted by a moving company who was contracted by the military to set up our move.

The first thing the moving company will do is schedule you for a time to get packed and moved. You request a time period and they do their best to fit you in during that time. Our moving company had to schedule us a week sooner than we wanted, but that worked out okay in the end.

After you are scheduled, the moving company will set up a pre-move consultation, in which a representative will come to your place of residence to do a scan of your household items. The purpose of this is to answer any questions you might have and to make note of how many large items, fragile items, etc. that you are requesting them to pack and move. The representative should also tell you how to prepare for your move and what they will and will not move for you.

Prepping for the Move

Prepping for the packers and movers is probably the hardest part of doing a government or partial DITY move. Here are some important things to do before they show up on your doorstep the day of the move:

-Go through your house and get rid of everything you don't need. Moving is the perfect time for purging your clutter and unused items, and there's no need to move something that you're only going to throw away when you get to your destination. Donate it, trash it, give it to a friend, just get rid of it if you don't love it.


-Remove all items above arms reach from cabinets, shelves, closets, etc. The packers will not touch anything they can't reach so you must move everything above that down to counters or tables.


-Take everything off the walls (pictures, art, etc.) and place on the floor.


-Place all your silverware in a large ziploc or small container of some sort and ask the packers to just pack the container/bag as-is. If you don't do this, the packers will individually wrap every piece of silverware and it will take forever to unpack. You can apply this method to other small, unbreakable items too such as hairbands and clips.


- Place all your clothes into garbage bags and ask the packers to pack them as-is.

If you don't do this, the packers will touch all of your clothes (including unmentionables) and have been known to use your clothes to help wrap other household items. It's also a good idea to toss a dryer sheet into the garbage bags with your clothes to keep them smelling good (or just use the Febreze brand of garbage bags like we did).


-Move everything that you do not want them to move into a designated closet or room.


It's too much for them to try and remember not to pack certain things that you tell them to, so just make it easy by only leaving out items that you DO want them to move. We had a lot of things that we were moving ourselves, so we cleared out the entire guest room and then used that as our "off-limits to packers" room. It turned out to be really nice to have a separate room that they didn't need to go in at all because we were able to hang out in there while they were packing and not be in their way.

-Unplug any appliances and electronics that you want them to move. If you have a deep freezer, you need to unplug, empty and defrost it at least 3 days before the move.

-Drain all oil and gas out of anything that would contain it (i.e. lawnmowers).

There are some things that the moving company will say that they won't move, but I recommend just leaving those items out because sometimes they actually WILL end up packing and moving those items. Their job is to pack as quickly as possible so they just want to get it done, and often won't bother with fishing through the items that they aren't supposed to pack. Just take your chances and hope that they pack it.

Here are some things I recommend keeping with you and not letting them move:

-Cleaning supplies, vacuum, broom, mop
-Paper towels and toilet paper
-Bath towels, hand towels, washcloths
-Food for your pets (you don't want to starve your poor pets do you?)
-Shower curtain (I forgot to keep this one and I regretted it immediately...it's hard to shower without a shower curtain)
-Air mattress, bed linens, and pillows (for sleeping on after they take your bed and/or when you arrive at your new location but don't yet have your furniture yet)
-A plastic bin or two (This has a double purpose...the first is to use them to pack your items that you are taking yourself, the second is to use them as a table when all your furniture is gone.)
-Fold out chairs (so you don't have to sit on the floor)
-Firearms (In my opinion, it's just better to move these yourself. Less liability.)
-Pots, pans, baking sheet, knife, cutting board, wooden spoon, etc. (Just the bare essentials of what you will need to do basic cooking in the kitchen. You will get really tired of eating out and/or fast food so it's nice to have the option to cook something yourself.)

Okay well that's all I have time for right now. I'll try to do another post in the next week or two with the rest of my abundant knowledge on moving. ;-)

I have to give credit to my friend Angie for a lot of these tips. She is an expert Army wife and several of these tips came from a blog post she made about moving.

Thursday, December 9, 2010

Turning my Frown Upside Down

Moving can be kind of a downer, especially if you're moving far away from all that you know. But there are some things that are helping to turn my frown upside down...

1. An excuse to drink Starbucks every morning, because the coffee maker is en route to Arizona.
Tall coffee with a pump of Cinnamon Dolce syrup, leave room for cream please! I'm becoming a Starbucks ordering pro!

2. The fact that I can still spend 30 minutes a day with my beloved Jillian DVD, even in a furniture-less house.
I purposely kept my 30 Day Shred DVD, hand weights, DVD player and yoga mat back from the movers for this very purpose. :)

3. My current nail color
Russian Navy by OPI...it makes me happy everytime I see my nails!

4. The fact that we can still have delicious home cooked dinners, even with the bare minimum of kitchen tools and food.
Last night's Beef & Veggie Spaghetti. It may not look pretty, but it was so satisfying.

5. The fact that our air mattress is SO MUCH more comfortable than I ever anticipated. I was DREADING the nights of sleeping on an air mattress, but it turns out it's not nearly as bad as I thought.
I highly recommend this brand of air mattress. It really is EXTRAORDINAIRE! :)

Wednesday, December 8, 2010

What do I do with Wheat Bran?

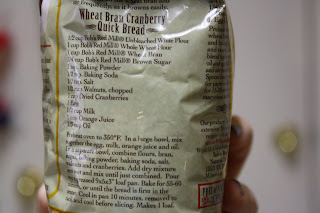
Remember how I talked about cleaning out my pantry a few weeks ago? Well, as I was taking inventory of all my pantry items, I found an almost-full bag of wheat bran and had no idea why I even had it in the first place.
What the heck do I do with wheat bran?!

Then I turned the package around and noticed a yummy sounding recipe for Cranberry Quick Bread.
And I just happened to have all the ingredients on hand. I also needed a breakfasty (it's a word) item to send with Alex to work the next day for his "Birthday Breakfast" with his squadron. I love when things like that happen! It's just meant to be. :)

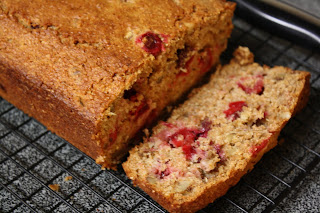
So I got to cookin' and this recipe came together in NO time! The hardest part was waiting the hour that it takes to bake. But when it's done, you get rewarded with this beauty:
YUM! Golden brown perfection!
And the taste is really great too. It's not too sweet with the lovely contrast of tart cranberries and the bran and walnuts add a nice texture to it.
This recipe is one that I would make again and again. In fact, I would probably go make it right now, if it weren't for the fact that I'm sitting in an empty house without any of my kitchen tools. Turns out, a random package of wheat bran isn't such a bad thing to have around after all!

Disclaimer: Although this recipe may seem healthy, since it includes things like whole wheat flour and wheat bran, it really isn't (see nutritional info at the bottom of the recipe). I'm sure there are a lot of healthy substitutions that could be made for the oil, egg, orange juice, etc. but I haven't experimented with that yet. Maybe I will sometime soon though.

Wheat Bran Cranberry Quick Bread

1/2 cup White Flour, Unbleached
1 cup Whole Wheat Flour
1 cup Wheat Bran
3/4 cup Brown Sugar
1 tsp. Baking Powder
1/2 tsp. Baking Soda
1/2 tsp. Kosher Salt
1/2 cup Walnut Pieces
1 cup Cranberries (I used half dried and half frozen)
1 Egg
1/2 cup Milk
1 cup Orange Juice
1/3 cup Oil

Directions:
Preheat oven to 350°F. In a large bowl, mix together the egg, milk, orange juice and oil. In a separate bowl, combine flours, bran, sugar, baking powder, baking soda, salt, walnuts and cranberries. Add dry mixture into wet and mix until just combined. Pour into a greased 9x5x3” loaf pan. Bake for 55-60 minutes, or until the bread is firm in the center. Cool in pan 10 minutes, remove to rack and cool before slicing. Makes 1 loaf, yielding 12 slices.

NUTRITIONAL INFORMATION

Serving Size: 1 Slice (87g) - Calories 220, Calories from Fat 70, Total Fat 7g, Cholesterol 20mg, Sodium 200mg, Total Carbohydrate 39g, Dietary Fiber 4g, Sugars 22g and Protein 4g.

Ashley's Notes: These could also easily be transformed into muffins, by placing the batter in muffin tins and decreasing the cooking time by about half (just a guess).

Monday, December 6, 2010

Moving Madness

I disappeared from blog world. Forgive me? Please? I have good reasons.

The past couple of weeks have been a mish-mash of traveling (Thanksgiving), finishing up at my job (last day was this past Friday), and prepping for the impending move.

Today was the day the packers came and packed our life into box after box after box.

116 boxes, to be exact. (According to the packers, this isn't that much, but I beg to differ!)

There are piles everywhere I look. Piles of boxes, piles of things to be donated to Goodwill, piles of things we are moving ourselves, piles of dog hair on the floor since I decided there was no time and/or reason to clean (and now that I see the state of my house after the packers came, I think I made the right decision).


At least one person in the house likes all the piles...

More things to nest on makes for a happy dog.

But there's also a lot of emptiness in the house (and it's only going to get worse when the movers come to pick up all the boxes tomorrow).
Empty shelves.

Empty closets.

Empty pantries. Empty cabinets. Empty stomachs (okay, not really...we've been surviving on a Pizza Diet...the diet of champions).

Now that most of the hard work is over, I should have plenty of time to catch up on backordered blog posts over the next week and a half.

I'll need something to keep me entertained, since I'm now "gainfully" unemployed and living in an empty house for the next week and a half before we leave for good. (You should see the amount of stuff I posted on the Book of Faces (facebook) today...it was borderline ridiculous, but I was bored!!)

I also plan on writing a couple of blog posts about doing a military move, since there is so much that goes into it.

So get ready for some fun. :)