Pages

Showing posts with label DIY Tutorials. Show all posts

Monday, July 26, 2010

Make Your Own Greek Yogurt

When life gives you lemons, make lemonade.

We've all heard that statement before. But have you heard the lesser known version?

When your grocery store runs out of greek yogurt, make it yourself.

No? Well, you should.

It all started when for the 2nd week in a row, my grocery store was completely out of all types of greek yogurt. Apparently they decided it would be a good idea to rip out and remodel their yogurt section right about now.

So for the past two weeks in a row I've been desperately searching every nook and cranny of the store for where they might have stuck the greek yogurt....to no avail.

I knew I couldn't go another week without my beloved greek yogurt. I've been eating greek yogurt for breakfast EVERY MORNING lately. With fresh peaches and granola and a drizzle of agave nectar. YUM.

Needless to say, I was becoming desperate.

So instead of my missing greek yogurt, I picked this up:

Plain old regular yogurt. YUCK. For some reason I seriously can't stomach regular yogurt but I LOVE LOVE LOVE greek yogurt. I think it's something about the watery nature of regular yogurt that I hate...which also explains why I love greek yogurt because it's not watery.

I know it seems irrational but I never claimed to be a rational person.

Anyway, I bought the regular 'ole yogurt and had a plan up my sleeve.

You see, I'd once read somewhere that you could easily strain your own yogurt and make it into greek-style yogurt. I just so happened to have cheesecloth on hand (yes, I'm serious and yes I know I'm a foodie dork who hoards things like cheesecloth "just in case").

However even if I didn't have cheesecloth, I've read that you can do this with a coffee filter or a thick paper towel too. So don't despair if you don't keep things like cheesecloth on hand like me!

I lined a colander with two layers of cheesecloth and then placed the colander inside a glass bowl to catch the water that drains out. Then I piled in the yogurt and stuck it in the fridge overnight.

When I woke up in the morning, I found this gloriousness:


I was SHOCKED by how much water came out of the yogurt overnight! SHOCKED. And really excited.

The consistency was PERFECT and it tasted just like greek yogurt.

I proceeded to pile half of it back into the container and half of it straight into my mouth.


Now there's no reason to distress if the grocery store runs out of greek yogurt.

PHEW!

Major relief.

Now THAT'S making lemonade out of lemons!

Tuesday, December 8, 2009

Ornament Wreath

I had seen several variations of this ornament wreath all over blogland lately. I knew immediately that I wanted to try making one so I bought all the supplies. Then, one night this week after work when I was getting anxious about Alex's impending homecoming, I sat down and got to work.

First you have to hot glue all the ornament tops to the ornament balls. Some of my ornaments that I bought seemed pretty secure so I tried to skip this step....bad idea. The tops started popping off of the balls and that is not good. So, a word of wisdom: Don't be like me. Do this step. Or else you'll be doing your wreath all over again when the tops start popping off.
My thumb looks so fat in this picture...haha. And please excuse the really old, nasty looking hand-me-down-from-my-mom hot glue gun.

Then you take a wire hanger and form it into a circle. I forgot to take a picture of this step but see the link at the beginning of this post for one. FYI the circle doesn't have to be perfect....the process of putting on the ornaments will kind of mess up your circle anyway. The main reason behind doing this is to smooth out the wire in the hanger so that the ornaments will easily thread on.

Once you have the circle, untwist the hanger's hooky part {that's the technical term} and do your best to smooth out the kinks in the non-hanger end. You know what I mean, right? Right. This part required me to bust out my pink needlenose pliers...yes I really do have a set of pink tools and I loooovvvee them. They were a gift at one of our wedding showers so if you gave us the pink tools and you're reading this THANK YOU! :)

Anywho, just start threading the ornaments on! I had a bit of a hard time figuring out what pattern to thread the ornaments on so that it looked as perfect as the Eddie Ross version. I never figured it out but I basically alternated between a large ornament, medium ornament, small ornament, repeat. I think......I don't know. Just do what you want. :)


Keep threading ornaments on until you start getting close to the end of the circle. Keep pulling the two ends together to see when you have formed a nice, full circle of ornaments.


All I did to secure the circle back together was to bend the non-hanger end of the wire back into a sort of "hook" and then I just hooked it around the hanger end. Once again that probably makes no sense. But that's it! Then I just added some poorly tied ribbon "bows" and hung it.

As you can sort of see in the above photo, I left the hook part of the hanger in tact and used it to my advantage for hanging purposes.
It turned out a big more oblong than circular and it's CERTAINLY not perfect, but I still love it! :)

Sunday, September 13, 2009

A Dresser of a Different Color

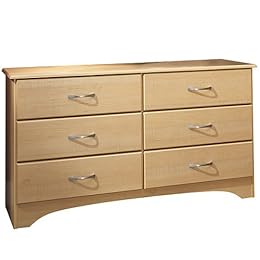
This is the story of an old dresser originally purchased from Target that looked like this one:

Photo from Target.com

I'm more of a dark wood kind of girl so I'm really not sure why I even purchased this dresser in such a light color. I bought it when I was in college so maybe I was hungover the day I bought it?? Who knows.

The point is I wasn't feeling it anymore. It was just sitting in my guest room being hated by me. So I decided to paint it and make it purty. Only problem was that this dresser is laminate, not
wood. Can you even paint laminate??

Yes, yes you can. First I removed the hardware {well actually this part happened when my
husband was home on R&R so I made him take off the hardware}. Then I used our palm sander to sand off the top layer, being careful not to sand down too far. You just want to get off the shiny laminate part. I forgot to get a picture of this step...sorry. :(

Then I used a small foam roller brush to paint on a primer that said it was suitable for laminate. {Bulls Eye 1-2-3 Primer to be exact}. Here's what she looked like after two coats of primer:
The only thing that sucks about this primer that I used is that it needs 7 days to completely dry. SEVEN DAYS?!?! Don't you realize I'm an instant gratification kind of girl???? So, I begrudgingly left the dresser to dry for 7 days {it was torture}. Once the primer is completely dry go back over the primer with sand paper to smooth out any bumps and things.

Then I was finally able to get to the paintin' part. Yahoo!!! I painted it an off-white Kilz color {and again I used a small foam roller brush}. Once it was painted and dried I reattached the hardware and VOILA!
I just love the way it turned out!! I probably should have given it a coat of polyurethane to protect the paint but I was way too impatient for the final product so I skipped it {for now...maybe I'll do it later}.

I love the feeling of a finished project!

Thursday, September 10, 2009

A Little Frame Makeover

My great aunt Ellabeth was quite a crafter when she was alive, and she also had a knack for painting. I was lucky enough to acquire one of her paintings that I love but unfortunately I was no longer loving the bronzey-gold frame holding it. However, the frame has great detail to it so I figured just a couple coats of spray paint would work wonders. Here she is all taped off and ready for spray paint. All I did pre-painting was wipe off the dust and grime that had accumulated on the frame. I didn't bother with sanding it or anything {lazy}. Then away I went with a couple coats of Dover White spray paint and voila!
{Please ignore the dog body in the background and the fact that the frame is resting on an ironing board}

I'm happy with the way it turned out and I think the white frame really makes the painting pop now! Also, although you can't tell in the photo, the paint job has an "antique" look to it where some of the spray paint didn't completely get into some of the nooks and crannies {aka I didn't spray it properly}....and I really like it that way! Sometimes laziness pays off people...I'm just sayin'.

So thanks, Ellabeth, for providing me with a one-of-a-kind painting that looks beautiful hanging in my living room. I miss you!

Thursday, August 13, 2009

Wreaths: Not Just for Christmas

This is officially the easiest wreath to make ever! I have to thank my good friend Connie for the inspiration. She made an adorable Army themed wreath with ribbon so I thought "Gosh, I could do that!" I decided to go with Aggie (Gig 'em!!) and football themed ribbon since football season is upon us!
As with everything I make, it's NOT perfect, but I'm okay with that. It makes my front door looks so much more welcoming!
Here's how I made mine:

Supplies:

-3 different types of ribbon...at least two of which are a bit thicker and are wired
-A plain wreath...mine was on sale
-Hot glue gun & scissors

Procedure:


STEP 1: Glue the end of the thickest ribbon to the back of the wreath and then start twisting and glueing along the front of the wreath. It doesn't have to be perfect! Once you get all the way around back to where you started just cut the ribbon and glue the other end to the back of the wreath.

STEP 2: Repeat STEP 1 with the other thick ribbon, filling in spots the first ribbon didn't cover.

STEP 3: Take the thin, non-wired ribbon and glue the end to the back of the ribbon. Then just loosely wrap it around the wreath, gluing to the back in certain spots as you go. Once you get all the way around cut the ribbon and glue to the back.

STEP 4: Make a couple bows (I suck at bows so please make yours prettier than mine!) and hot glue them to the front of the wreath.

Voila! That's it! So easy, right?!?

Tuesday, August 11, 2009

An Imperfect DIY Topiary

I am loving topiaries these days! I've been seeing them everywhere lately...blogs, catalogs, stores, and more. I decided a topiary would be the perfect centerpiece for my mantel that needed a serious re-vamp so I went about making one. Yes, I made one. Wanna see?!?! Okay here ya go:Sorry about the blurry pic...I was impatient! Oh and SO WHAT if the stick is leaning a little bit. Get over it! ;-) And it took about 3 times as many fake flowers as I originally anticipated so there is definitely a bald spot at the bottom for the time being (a.k.a. until I get unlazy). I CAN'T BE PERFECT PEOPLE!

So basically to make it I just followed this tutorial on a blog that I love. However I'm still going to type out how I did it because I did change a few things.

1. Spray painted a clay pot with a couple coats of black paint, let dry, and sponged on the white circles.

2. Bought a dowel rod, cut it down to the height I wanted for my topiary, and spray painted dark brown. Then doggie decided to help me with the "weathered" look and proceeded to steal it off the table as it was drying and put some nice teeth marks in it. At first I was peeved about this but then I realized the teeth marks actually made it look more like a real stick! The jokes on me I guess!

3. Bought a styrofoam ball and 4 bunches of fake yellow flowers (they were on sale 50% off...thank goodness because this could get pricey). Like I said, this required way more flowers than I originally anticipated so beware! Pulled all the flower buds off the stems.

4. Hot glued flower buds around the strofoam ball, bunched tightly so you can't see any styrofoam, although I will say my foam ball was green and so were the centers of my flowers so it really didn't look that bad if there were tiny bits of foam showing...it just looked like a flower center...but I digress.

5. Bought styrofoam and cut it to fit in the bottom of the clay pot. Stuck the dowel into the flower ball and into the clay pot styrofoam. Hot glue into place for the most stability.

6. Bought a bag of moss and hot glued moss all over the top of the clay pot to cover the styrofoam base.

7. Voila! That's it. I am probably going to add a decorative ribbon to the dowel eventually to add a little more pizazz.

And to wrap it up, here's my new re-vamped mantel. I forgot to take a before picture but trust me, this is MUCH improved and totally different.It still needs more but for now I'm loving it! I plan on purchasing some fake flower to put in the green vase to add some height soon. I love the green with the black and white, though. Here's another view: